
How to invite members
Invite one person by email when you know who should join and which role they need. Share a reusable Join Code when families should request access before a Unit reviewer approves them.
1. Open Invite from Home
Section titled “1. Open Invite from Home”Choose the correct Unit, open Home, and select Invite in the header.
2. Choose how the person will join
Section titled “2. Choose how the person will join”Woggle offers two paths:
| Choose | When to use it |
|---|---|
| Invite by email | Send a private Invite to one person at a verified email address. |
| Share Join Code | Let families use a reusable code or link to request Unit access. |
A Join Code does not add someone immediately. A Unit reviewer must approve each request. The code remains reusable, so share it only with the families who should request access.
3. Confirm the person and intended role
Section titled “3. Confirm the person and intended role”If you manage the roster, Invite by email opens Who are you inviting? Choose Youth member or Adult leader, then enter Full name.
- For a youth, enter the Parent or guardian email. That adult finishes joining and connects the youth to the correct family profile.
- For an adult leader, enter their Email address. Only a Unit Admin can invite adult leaders through this form.
- Unit role → Unit admin appears only when your permissions and the Unit’s administrator-invitation setting allow it. Otherwise the adult invitation is for Leader.
If you have invitation access without roster-management access, Woggle may show the direct Parent/Guardian invitation form instead. Use the recipient’s own name and email and choose only a role Woggle offers. For families who should choose their own participation, use Share Join Code.
Check the email carefully. If the recipient sees Use the invited account, they must sign in with the email named in that message before continuing.
If the youth already appears in a Household and only needs their own Woggle sign-in, follow How do I invite a youth to use their own account? instead. That flow links an account to the existing Youth profile without creating another Unit membership.
If the person belongs to an existing Household, confirm the email with its Guardian before sending. Sending the invitation prepares the person’s next step; it does not activate an Invited roster entry. The recipient must complete the correct account and family steps.
4. Add Groups when they are already known
Section titled “4. Add Groups when they are already known”In the roster invitation form, open Groups under Groups (optional). Select the available den, patrol, committee, or other Group, then finish the picker. Canceling keeps the preceding selection. In the direct Parent/Guardian form, use Add to groups (optional) when shown. Leave Groups empty when the assignment is not settled.
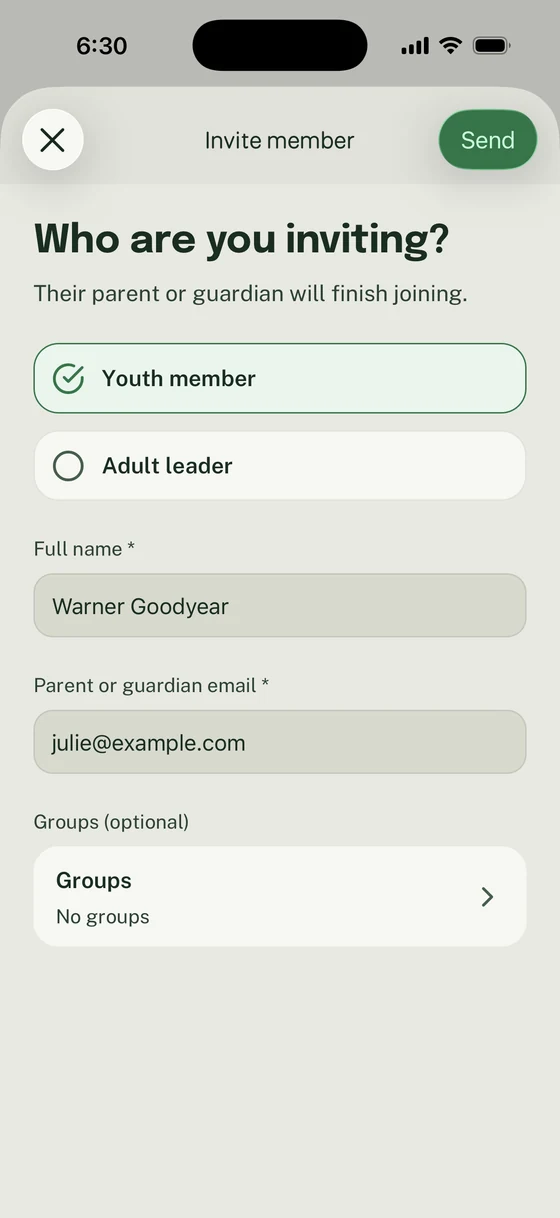
Review the recipient, intended role, and optional Groups before sending.
Group assignment controls what the new member joins inside the Unit. It does not change their Household.
Select Send when the recipient, role, and Groups are correct.
5. Share a Join Code carefully
Section titled “5. Share a Join Code carefully”For Share Join Code, select Show Join Code. On the ready screen, share or copy the link. When Woggle shows an Invite card, you can share or save the card so families can scan its QR code.
Anyone with the Join Code can submit a request. Send the link, code, or QR card directly to the intended families instead of posting it publicly.
6. Check the Invite result
Section titled “6. Check the Invite result”After sending, review the confirmation and open the person’s Invited roster profile when available. Check the intended person, email, role, and Groups.
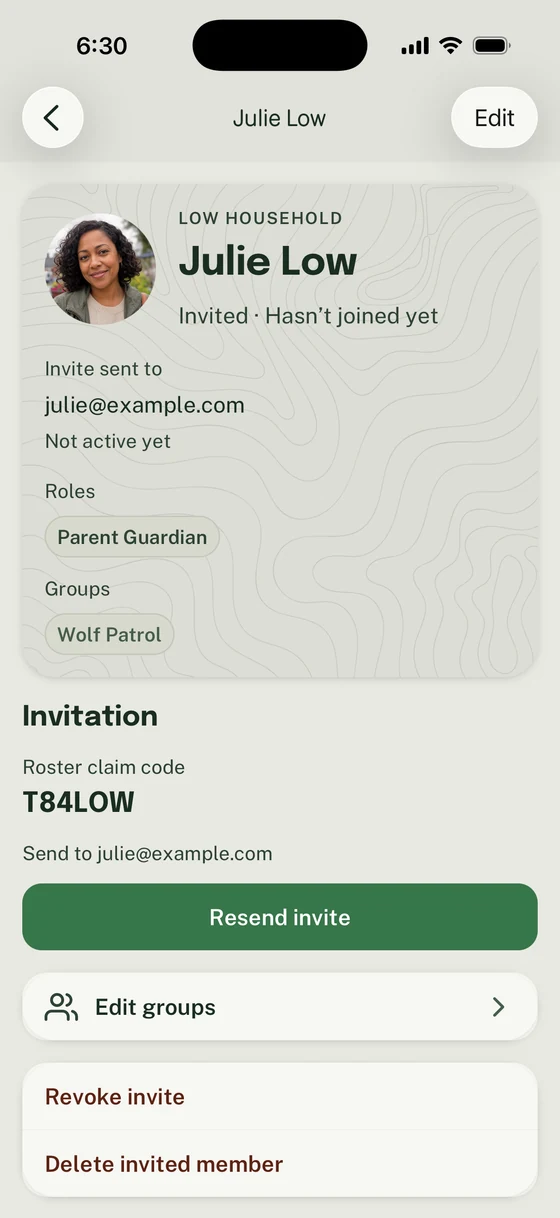
An Invited roster profile shows the prepared person and their current invitation. It does not confirm email receipt or active participation.
Check Active and Invited in the roster. An Invited entry does not grant Unit access. An approved person can still be waiting for an account connection, so check their current participation rather than assuming that sending an Invite completed the process.
A Join Code can lead to a family participation request. Each person requests their own participation, registration choice, roles, and Groups. Follow family request review to save decisions and finalize the result. Saving a decision alone does not activate anyone.
Add someone from an official roster
Section titled “Add someone from an official roster”The roster’s Add from official roster action opens the same prepared-person invitation flow. It is available to roster managers; adult and Unit Admin invitations have the additional limits described above. Enter the person’s name and the appropriate email. For a youth, Woggle asks for the Parent or guardian email.
This creates an Invited entry. The recipient confirms whether the person is new to their Household or matches an existing profile. Some matches need Unit review before the person becomes active.
Open an Invited roster profile to review the link, recipient, and Group choices. Use Manage invitation when that action is shown. Use Edit groups when the invited person’s assignments need to change, then Save. These Groups apply when the person joins.
Revoke invite stops the current link working and retains the invited record so you can use Send new invite later. Delete invited member removes the prepared Invited record and stops its invitation. Read the confirmation before choosing either action; neither is a general Household correction.
Fix an Invite before sending another
Section titled “Fix an Invite before sending another”The email is wrong. For an existing Invited roster record, revoke the incorrect Invite, enter the corrected email on that same profile, then select Send new invite. Reuse the prepared person rather than adding another roster record. If the recipient sees Use the invited account, they should select Not you? and sign in with the email named in that message.
The person is still pending. Open their roster entry and select Resend invite when that action is available.
The person already belongs to the Unit. Use the existing roster entry to review their role and Groups instead of inviting them again.
For rollout timing and family messaging, use the Woggle rollout kit.
Thanks. Your feedback helps us keep this page useful.